Tuesday, February 22, 2011

I am a Robot.

I've been working on this project for quite some time and finally finished it. I got my inspiration from an older video on Paper Phenomenon. It's a canvas to hang on the wall with a mini scrapbook. Robot style for Jonathan.


I added some dimensional foam under the robot and gears and added some crystal laquer to some parts.


Oh how my baby has grown. I can't wait to get this one up on the wall. And Jonathan loves his Robot.


***Now I have to say that my counter is increasing but I'm not feeling the love :-)
Leave a comment, say Hi. When I start getting some more hits then I'll do a blog candy.
Need to know you are out there first***
Happy Stamping!
Sarah

Monday, February 21, 2011

Cupcake Wishes


I was playing around with my sewing machine to see what I can do. And ended up with this beautiful birthday card. Very simple but lots of detail. And I really love it!

I started out with a green cardstock base and stitched on some glitter cardstock right to the front of the card. Well that was interesting...I totally didn't think about the stitching on the inside of the card, hmmmmm. So then I had to decorate both sides of the inside of the card. I've never done that before - but I like it!
I made the flower out of layers from a sizzix's die cut (can't remember which one). On the back is a neon green prima flower that has been distressed. The layers on the flower are inked and shaped before being glued together.

On the inside I stamped my stampin' up stamp 'celebrate one cupcake at a time'. The ink wasn't quite dark enought so I had to write over it with a sharpie. Still looks good :-)

Stay tuned for some rockin' robots tomorrow. You're going to want to see them.


Happy Stamping!


Sarah

Wednesday, February 16, 2011

Class Valentines

This year for Madison's class valentines we decided to do nice and easy. We love to make them but I know that the kids are just ripping them apart and throwing them out :-)
So cinnamon hearts in a baggie it is. Madison did all her own coloring too - less work for me.


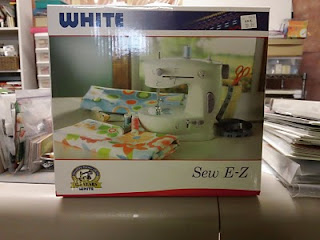
We went to Port Huron last weekend just for fun on Sunday and of course I checked out the Jo-Anne's Fabrics flyer first. They had this little sewing machine on sale and I've always wanted a machine to do some stitching on my cards. I really like the look that you get from it. I'm actually pretty excited because I think it will go well with my chipboard album I'm working on - the paper is a sewing theme. The sewing machine is basic and only does the one stitch but for mre that's probably the best idea and it doesn't take up very much room. Even handier is that you can take it with you when you go to crops - neato!
Well stay tuned for some stitched projects. I'll be sure to share.
Happy Stamping!
Sarah

Tuesday, February 8, 2011

New project...

So I decided to pull out some of my prize possessions. A Maya Road chipboard binder album (it has chipboard pages too!) Some Tim Holtz metal flower fasteners and DCWV Crafty Stack paper.
Here's a close up of the beautiful paper and Tim Holtz fasteners. I looooove them.


So, you wondering...the theme of my project?
Well some of you may know that we moved almost a year ago to a new house, which I looooove (hehe). Finally I plan to scrapbook it in this super cool album.
Here's the cover but not really assembled, just the beginings. The front has a Maya Road chipboard plaque covered with paper and rub on home's with some glitter stickers for sweet. The flower will be used to make a ribbon clasps that comes from the back. You'll have to see when it is done. I will keep you posted on my progress.
Happy Stamping!
Sarah

Monday, February 7, 2011

Valentines Easel Card

I bought this new Magnolia stamp yesterday and just had to ink her up right away. I thought she would be perfect for Valentines. I also haven't done much coloring lately so I thought I'd try out my Stampin' Up! watercolor crayons.

It was kinda fun, instead of coloring with the crayon and then adding water I used my brush with a little bit of water directly onto the tip of the crayon to pull off some color. This gave me alot more control when it came to shading. The only thing I wasn't too please with was the skin tone. I really like my copic markers when doing skin.

I've done one or two easel cards before but this time I added more layers and pretty big flowers. Don't know how it would fit in an envelope but finished it looks pretty nice.

I added a little bit of bling and a Happy Valentines Day stamp to finish it off. More layers is definately one of my other resolutions for this year. Use it all and layer, layer, layer.


Here's a side view for you. Hope you enjoyed.

Happy Stamping!
Sarah

Friday, February 4, 2011

Love Notes


Okay so this year I vow to make whatever I want, whenever I want and use everything. Yes I said EVERYTHING!!


Are you like me that you have stash upon stash of the coolest scrapbooking supplies ever? But you just can't bring yourself to use them.

Well then ladies, this is the year. Use all those supplies that you have been hanging onto - what is it going to hurt. Wouldn't you rather see them in an awesome completed project than sitting there collecting dust in the package.

Check out this - a love note collector. You can hang it on the door to you bedroom or on your cubicle at work :o) Make one for the kids, have fun. I'm using my awesome pure white prima flowers like there is no tomorrow and guess what...I still have more left.


I used a giant coaster for the base and covered with some really awesome little yellow bicycle valentines paper. Yes it is double sided but you know what...that one side looks great! Check out the detail that I "hot glued" on. Yup I used my glue gun :o) I even made those little ribbon flowers from some really cool ribbon that I got at Michaels eons ago, you know the ones that come on the wooden spools that I bought with a big glass bowl to display them in. Well they are not going to be displayed anymore - they are going to be used.

Lastly I have a view from the top for you. You can see how deep I left it to put all your favorite valentines into. Even if you don't get valentines anymore it is a super cute holder that can be used for so many things. You don't even have to do it for valentines day, you can do one to hold postage or pencils.

I hope you enjoyed my ranting :o) All I can say is prepare to be amazed. There will be project upon project and I will not be holding out. I'm going to use it all!

Happy Stamping!

Sarah

Thursday, February 3, 2011

!!!Happy New Year!!!

I know - I suck at blogging - do you need a big list of excuses - no I don't think so. I'll just remind you that I have two kids, a husband (which may also count as a kid) and a full time job. Whew! I am superwoman :-)

We took some time to do some decluttering and finish unpacking our boxes and guess what? We can park in our garage, wooohooo! I have to tell you that now that we are into our Ontario winter and getting blasted with more snow than we have had in years, parking in the garage is all worth it.

I've also had some bouts of artistic block. Yes, too many products, too little time and don't know what to do. I have some unfinished products lying around and just don't feel like finishing them. I'm keeping up with my blog stalking though. A shout out to my two most fav's right now - Following the Paper Trail and Paper Phenomenon. I'm a closet PITA babe - you'll have to check it out. Both of these talented ladies have live classes on Ustream, if you haven't seen them you need to check it out - it is fun, and if you can't be there live (like me) then they record them and you can watch them later.

Today I just did a real quicky card design that I found while blog stalking.
http://sendingyoualittlesmile.blogspot.com/2011/02/for-my-tweetheart-spring-fold-card.html

I had to make it right away. Hope you like it. Mariska has a link on her page to splitcoast with the instructions.


Hope you like it and hopefully I will be able to find the time to keep sharing.


Happy Stamping!
Sarah